Pumpkin Passport – March

The March installment of the Pumpkin Passport has us riding past a tulip field in the Netherlands. And what a wonderful view it is!

Cross stitched Pumpkin Passport - London, Paris, and the Netherlands

It’s definitely on my bucket list to see the tulip fields someday, but for now, the cross stitched version will have to do.

I’ll admit that I finished this before the month of March was over, however it took a few weeks to get posted since my life is currently being sucked away by Stardew Valley. I will not admit to just how many hours I have already put into a game that was only released six weeks ago, but it’s obvious that blog posts have fallen to the wayside because of it. I have lots of projects to post – I’ve made good progress on squares for the Lattes and Llamas Geek-a-Long, and even finished off a crocheted baby blanket for a co-worker. So hopefully I can pull myself away from my virtual farm for long enough to get those up here sometime soon. No promises though… there are crops to plant, animals to feed, villagers to woo, and a mine that needs exploring…

Pumpkin Passport – January & February

I am clearly a sucker for craft-a-longs. How else can I explain talking myself into yet another year-long Frosted Pumpkin stitch-a-long? Like the WIP pile wasn’t already big enough! But this year’s stitch is travel themed, and like everything Frosted Pumpkin, just too darn cute to resist.

Here’s a shot of the full piece after I finished stitching the January & February installments. I really love that the layout is horizontal and that it’s clearly going to be a full scene rather than individual framed motifs like the last two stitch-a-longs.

Let's go on an adventure cross stitch

Here’s a close up of the January and February stitch:

Cross stitched Pumpkin Passport - London and Paris

An interesting side note is that I have actually been to both London and Paris. These are likely to be the only cities in the Pumpkin Passport that I’ve actually visited!


2016 Geek-a-Long Update 2

I’ve finished two more squares for the Lattes and Llamas Geek-a-Long. Double knitting is absolute magic to me. If you’ve never tried it you really should. As I’ve said before, I don’t knit very often, so I’m not an accomplished knitter. Double knitting looks impressive but is actually incredibly easy to do. The basic action is a simple knit one, purl one, which with one strand of yarn creates a basic rib. In double knitting you always carry two strands of yarn. You knit with the colour you want to see on the side of the fabric that is facing you and purl with the other strand. Effectively making two pieces of fabric at the same time. Beautiful two colour images with no nasty colour changes. Magic!

I double knit slightly differently than the Llamas do, but they do have a video tutorial to help get you started.

Here’s the front and back of my Kirby square:

Double knit Kirby square

Double knit Kirby square

And my Sonic the Hedgehog square:

Double knit Sonic the Hedgehog square

Double knit Sonic the Hedgehog square

Three down, at least 21 to go…

2016 Geek-a-Long Update 1

OMG it’s a Geek-a-Long! Every year the talented ladies over at Lattes and Llamas plan a geeky craft-a-long in support of the Child’s Play charity, and somehow I didn’t know until now! To make this year’s geek-a-long even more exciting to me it’s specifically focused on video games.

How it works is that every Sunday throughout the year a new pattern for a geeky square is released. The goal is to craft at least 24 of the squares and stitch them together to create a seriously awesome afghan. The patterns are clearly designed primarily for double knitting, but could be crocheted (or even cross stitched, beaded, you name it) if you prefer.

The patterns are released for free, and the organizers simply ask that if you enjoy the patterns you consider making a donation to the Child’s Play charity. How cool is that?

I don’t do a lot of knitting so I was a little hesitant to jump into a year long knitting project. But as soon as I saw a square featuring the prince from Katamari Damacy I knew the Lattes and Llamas ladies were geeks after my own heart and that I’d end up getting sucked into this adventure.

Conveniently, I learned how to double knit not that long ago from Alasdair Post-Quinn’s Adventures in Double-Knitting class on Craftsy (which is excellent by the way) so this is also a great way to practice my new skills.

Here’s the front and back views of my first square. Only 23 more to go 🙂

Double knit Katamari Prince front view

Double knit Katamari Prince back view

Chainmaille Jewellery

I’ve been busy making chainmaille jewellery again. The first one is a necklace from the book Chain Mail Jewelry by Terry Taylor and Dylon Whyte. It’s based on a standard European 4-in-1 weave and uses 20g (AWG) 1/8″anodized aluminum rings and size 6 seed beads.

Beaded European 4-1 chain mail necklace

Beaded European 4-1 chain mail necklace

This is one of my favourite pieces I have made so far and I actually wear it quite frequently. I have a sweater that matches the bead colour perfectly and I think it ends up looking quite striking!

Next up is a dragonscale weave bracelet. To make this one I followed the beadaholique video tutorial. I really love the look of the dragonscale weave, but I’ll tell you, it took forever to make, so I’m very glad I was only planning for a bracelet. The outer rings are 18g (SWG) 1/4″ silver anodized aluminum, and the inner rings are 19g (SWG) 5/32″ green anodized aluminum.

Dragonscale chain mail bracelet

I think the finished bracelet looks pretty cool, but it’s a little too bulky for my tastes so I don’t know how often I will actually wear it. I am however, quite taken with chainmaille so I’m sure there will be more pieces to come!

Kirby

I’ll sheepishly admit that I’ve never actually played a Kirby game. I’ll also admit that I finished this little guy quite awhile ago but never managed to post him here. That being said, here’s Kirby with his star pillow:

Amigurumi Kirby with crocheted star pillow

Amigurumi Kirby with crocheted star pillow

You can find the PDF pattern on the Patterns page.

Kirby came into creation solely because he’s simple shapes to practice on as I keep trying to develop my amigurumi design and patterning skills. He now lives on the desk of my husband’s co-worker Kerby, who also may have never played a Kirby game. But apparently having the same name with a different spelling is enough to get you gifted with toys 🙂

And a couple more pics, just because:

Amigurumi Kirby

Crocheted star pillow

Perler Bead Vault Boy

I was coveting Fallout 4 on Steam the other day (I’m currently playing Witcher 3 and Diablo 3, so no new games for me, yet) and stumbled across this screenshot from the game:

Fallout 4 Vault Boy screenshot

Oh Bethesda, pixel artists everywhere thank you. Out came the perler beads and in no time at all I had my own beaded Vault Boy:

Perler bead vault boy

Who knew post-apocalyptic could look so adorable?

Chainmaille Button Bracelet

When I find myself with a day off with no obligations I usually end up reaching for my current cross stitch WIP. But for some reason it just wasn’t calling to me the other day, so I ended up rummaging through my craft cupboard for inspiration instead. What I found was this adorable container of buttons I couldn’t resist buying at Michael’s awhile ago.

Container of multi-sized grey buttons

I had no real plan for these when I bought them but have since seen a number of chainmaille button bracelets and thought these would work well for that. So out came the jump rings.

I started with a simple base chain of single jump rings. I used 18 gauge (SWG) rings with a 5/32 inch inner diameter. The final chain was 40 rings long (I think the one in the picture is a little longer, but I ended up removing a few rings at the end). Attach a closure of your choice to one end of the chain.

Base chain for button bracelet

Next comes the fun part, start attaching buttons. I didn’t have much of a system for this. I had seven different sizes of buttons, so I simply tried to alternate larger buttons with smaller buttons. I used whatever size jump rings I happened to have that would nicely fit through the button and base chain without leaving too much extra ring. (This is a great project for using up random left over rings from other projects!). I tried to alternate adding buttons above and below the base chain, although, since the chain twists, this became harder and harder to do as more buttons were added.

Five buttons added to the base chain

I added a single button to every ring of the base chain except three rings on either end, which helps make the bracelet a little easier to put on. Here’s the final result:

Button chainmaille bracelet

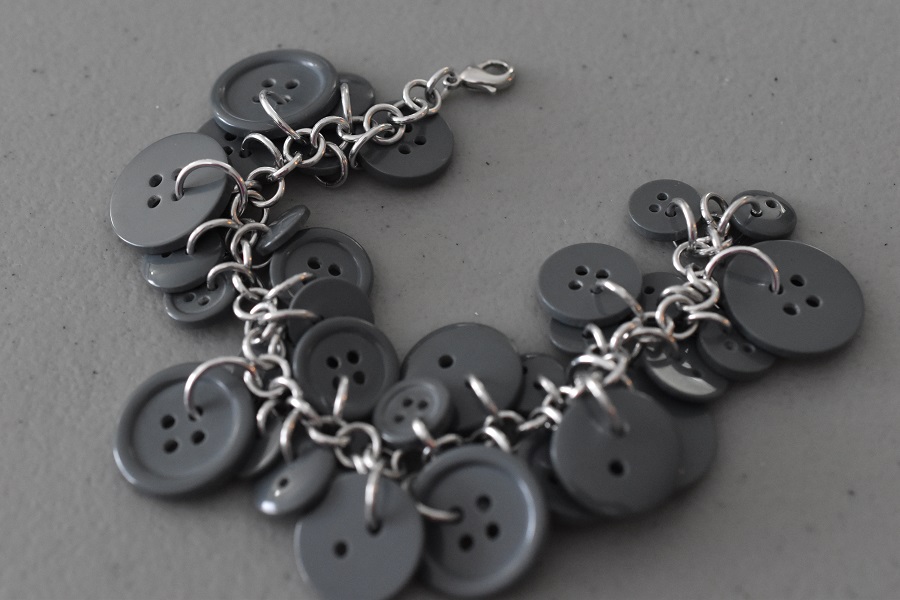
Pretty cute, right? I don’t wear a lot of costume jewellery, so if I made another one I think I would only use smaller sized buttons, but since the goal here was to use up the buttons I had, I’m pretty pleased with how it turned out. I think there’s also a lot of room to vary the sizes and colours of buttons to achieve different looks. I’m picturing a bracelet starting with the largest buttons in the middle working out to smaller buttons on either end instead of the randomly positioned sizes I used. I guess I’m going to have to go shopping for more buttons. So much for actually clearing something out of the craft cupboard!

Frosted Pumpkin Stitch-a-Long Finished!

Yippee!! I actually managed to finish the Frosted Pumpkin Story Time Stitch-a-Long before the end of the year!

The final piece is a scene from Charles Dickens’ A Christmas Carol.

Cross stitch Scrooge from A Christmas Carol

Much though Scrooge is gosh darn cute, I sadly, must admit that I wish the final square in this piece hadn’t been Christmas themed. But at least it has a reason to be there since A Christmas Carol is a great story. I guess I’ll just have to learn to love it.

Here’s the finished piece:

Frosted Pumpkin Story Time Cross Stitch

The only books featured that I haven’t actually read are The Phantom of the Opera and A Christmas Carol. I guess those will have to be the start of my reading list for next year.

The final piece is about 7 3/4 by 10 1/2 inches stitched over two threads on 28 count, hand dyed lugana from Picture This Plus (the colour is called Storm).

It really was a joy to stitch with each month’s installment easily completed in just a few evenings. Next year’s stitch-a-long is travel themed. I haven’t decided yet if I’ll join in or not. I’m sure I’d enjoy stitching it, the problem is always what to do with it when it’s done, and how many samplers I really want to frame and put on my wall! I also bought the pattern for the 2014 sampler which was fairy tale themed, so I may start into that one instead. Or just focus on some of the WIPs and kits I already have taking up room in the craft cupboard. Too many choices, but it’s such a wonderful problem to have 🙂

Candy Monster

I’m a huge sucker for cute crochet. Particularly cute crochet with a bit of an edge. So when I found Brenda K.B. Anderson’s Beastly Crochet: 23 Critters to Wear and Love, I was totally smitten. The book is full of patterns for purses, stuffed creatures, slippers, baby clothes, and more, all featuring adorable monsters, skulls, vampires, robots, and other delightful critters.

My first creation from the book is a hilarious candy monster, with a particular penchant for chocolate.

Crocheted candy monster

He’s an interesting type of design that I haven’t encountered before. He’s crocheted in the round, like any amigurumi, using a wool yarn, and then felted in the washing machine until the fabric is dense and can stand up on its own. Once the felting is complete, a hole is cut for the mouth turning him into an adorable container. It never occurred to me to use the hollowness of amigurumi as a feature rather than simply a repository for stuffing. Obviously, this would only work with felted fabrics as the felting helps prevent the cut yarn from unraveling, but I think this technique opens up a lot of possibilities for purses and bowls.

And who doesn’t want an adorable monster sitting on their desk guarding their afternoon snack? I just hope he’s willing to share!