Crafting involves a fair bit of trial and error, which often means that for every great result there are a couple of misses. Here’s one of mine.
I recently purchased a package of BIC Mark-It Permanent Markers so when I had a free night I thought I’d continue my shrink plastic journey and see how they work.
Turns out the colour assortment is almost exactly what’s needed for Rainbow Dash.
I traced an image onto bright white shrink plastic, coloured it and cut it out.
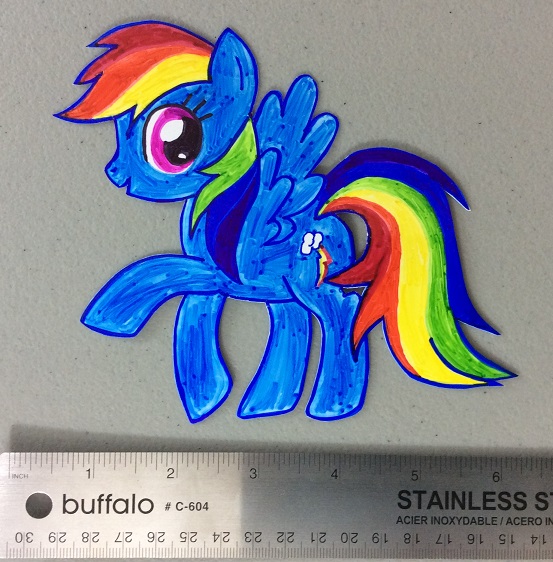
I wasn’t super thrilled with all of the marker lines but they were completely impossible to get rid of. My hope was that they wouldn’t be as obvious after shrinking.
Into the oven she went and here’s what come out:

Ouch.
For anyone who doesn’t know, here’s what she’s supposed to look like:

I definitely did not pick the right shade of blue. Mine looks like she’s been rolling in a blueberry patch for a month.
So what should I have done differently? Tested the markers before I started the project. I guess late is better than never. I took another piece of the bright white shrink plastic and added a coloured strip with each marker.

Into the toaster oven, and voila, a shrink plastic guide to my marker collection comes out.

Notice how the dark blue on the left turns dark purple. The second blue on the left (the one I used for Rainbow Dash) turns dark blue, the brown on the right turns black, and the red in the middle almost looks brown. Not at all what I was expecting. But now I know for next time.
Here’s the sample with the markers for comparison. (Yeah, there are a couple of Sharpies in the mix. The dark blue in my BIC set was completely dried up, but I threw the receipt away long before I discovered this. And the light purple was just too pretty to pass up).

What did I learn from this crafting fail?
- Test your markers first to see what colour they will be after shrinking.
- When colouring, let each colour dry before moving on to the next to minimize bleeding.
- Let the whole piece dry before trying to cut it out to minimize smudging.
- Brush strokes will still be noticeable after shrinking but not as noticeable as before.
- Marker is easily scratched off the finished piece so seal it to prevent accidents.
- If touching up outlines after cutting a piece out, be sure not to get any marker on the edge of the plastic. Or, intentionally colour around all the edges so you won’t have just the occasional spot of colour.
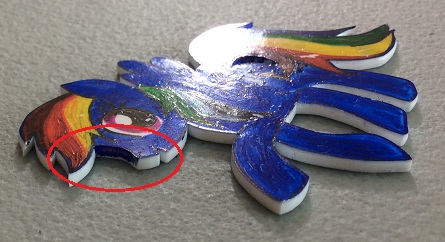
(See the nasty spot of blue left behind by a post-cutting, pre-shrinking, outline touch-up?)
- Rainbow Dash looks really silly in blueberry blue.
So far markers are definitely not my colouring agent of choice for shrink plastic. Does anyone else have any experience colouring shrink plastic with markers? I’d love to know how it worked out for you.
